Tuesday, April 2, 2013

Chocolate Granola

Happy Autism Awareness week!

Today is gorgeous! I'm sitting outside watching my chickens eat as much green grass as they can handle. They are so happy to be out of the chicken yard and in the garden. It's a great time of year to let them into the garden. They'll eat up all the grubs and larva that will grow into bigger pests later.

Okay, so homemade granola. One, it's easy. Two, it's delicious. Three, it's healthy (mostly).

This recipe is easily adapted for any amount you want to make. The amounts I have below are based off of the amount of ingredients that will fit on one of my baking sheets. If you want to make more or less, just eyeball the amounts that look good to you as you add them to the pan. Also, all of my measurements that are in ounces are just approximations from the bag size. I can get about 3 batches out of one 12 ounce bag of chocolate chips, so I use about 4 ounces.

Preheat your oven to 350.

Pour 2 cups of steel cut oats out onto your baking sheet, and give it a shake to spread them evenly around the pan.


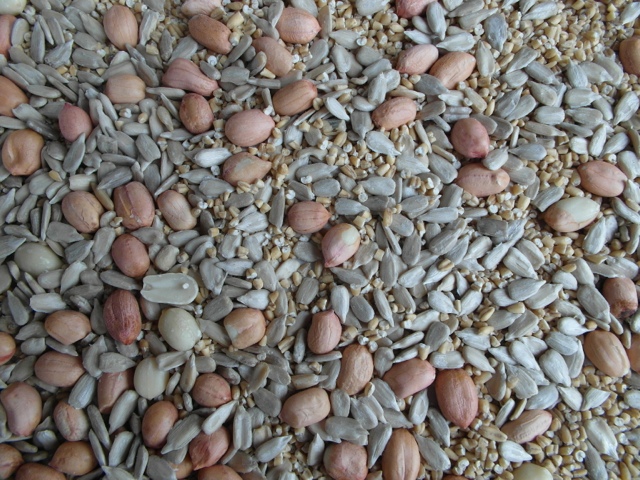
Next, add a cup of nuts. I used raw peanuts because they were on sale. Also, I love peanuts. I frequently use raw almonds in this recipe, and you can use whatever nut you want.


And if you want to add some seeds you can do that now as well. I added 1/2 cup of sunflower seeds I needed to use up.

This goes into the oven for 20 minutes, taking time to pull it out and stir it half way through. The oats around the edge of the pan will get too dark if you don't stir, so use a rubber spatula to pull the oats from the outside to the inside and give it another shake to even everything back out.


Everyone's a sous chef.

After 20 minutes I add my fruit. You can use any dried fruit you like. In this batch I used 3.5 ounces of dried coconut...


...and 1 cup of raisins.


Put the granola back into the oven for 5 to 8 minutes. If you are using coconut, keep a close eye on it. Lightly browned, toasted coconut is delicious, but it goes from brown to black very quickly.

Gorgeous

Lastly, after you pull the pan out of the oven, add about 4 ounces of chocolate chips. Sprinkle them all over the granola. The heat from the granola will melt them as you mix. I use my rubber spatula to press the granola into the chocolate so that everything gets an even coat.


Chocolate just starting to combine

Chocolate mostly worked in

Chocolate completely coating the granola and spread out on the pan to cool

Before you scoop the granola off the pan, it needs to cool so that the chocolate can harden. I usually just leave mine out on the counter for a few hours, but you can put it in the fridge.

Once everything has cooled, you can scoop your granola into an airtight container for storage. Use your hands to break up any chunks that look too big for a spoon.


This granola, in a cereal bowl, with some whole milk is one of my favorite snacks. We would eat it for breakfast every day before we had chickens. I hope you enjoy it as much as I do!


Tuesday, March 26, 2013

Grapefruit sex

The weather was so nice today, Sirius and I had to take an extra long walk. Keep it coming Mother Nature, keep it coming!

In honor of our nice weather, have some bonus pictures.


This is my mini grapefruit tree. I think if I planted it outside, and lived in Hawaii, it would be a full size tree. But it's small because it's in a pot in my living room. This is the first year that it has flowered. I'm excited to have my own fresh grapefruit in a few months. But you know where babies come from. I've been using a Q tip the past few mornings to spread the love from flower to flower. My living room smells amazing!


We also brought home a gerber daisy from the grocery store this weekend. We should have some flowering bulbs by now, but it's just been too cold. So I brought home some flowers for the inside. Husband wasn't thrilled that it was orange (go Knights!) but it was the only color they had.


Albus thinks it's pretty though!

Sunday, March 24, 2013

Egg roll experiment

When I started posting recipes on this blog, I decided I didn't just want to post recipes that were perfect, that I had made four or five times and finished (If you can ever consider a recipe finished). I want you to see that it's okay to start with an idea, and have it be okay, or even bad. And that's not the end of the world. We see chefs on TV that tell us this is the exact way to make a dish. They don't show you the time they put into each recipe. They don't talk about how it's their job to come up with new recipes, and they don't have to scramble to put dinner on the table after working until 7pm. They don't show you the two other variations on their technique that would also taste great. I want this blog to show that it's okay to experiment and make mistakes because we are almost never exposed to that in food media. You cannot be a home cook if you're afraid to make mistakes. And we know that cooking from scratch at home is better for your health than eating out or buying processed foods.

I have never made egg rolls before, but it seemed like an interesting vehicle for leftovers. We had a leftover pork roast that needed used up, so I decided to give it a try. These are pork, sweet potato, and onion egg rolls with dijon dipping sauce. They are not Asian themed egg rolls, this was just a means to use up my leftover pork roast and one, lonely sweet potato.

Since I had a huge chunk of roasted pork shoulder left, and I HATE shredding meat, I decided to see if all the hype on Pinterest about shredding your meat in your stand mixer is true. My response with pork is, sort of.


First, you have to remove the bone. :) Also, it did not work with a piece of meat this size. I had to cut it up into two inch chunks. After cutting it into smaller pieces, the mixer did break the meat down. Some of it was shredded, and some of it was, well, mashed. I was not impressed. Maybe it's a better technique for chicken.


I almost never peel vegetables, and this was no exception. I gave my sweet potato a good scrub and cut it into thirds. I then cut it into planks, and cut the planks into match sticks. One of my main concerns was that the egg roll wrappers would finish baking and the sweet potatoes would still be raw.

I then cut 1/4 of an onion into match sticks.


Then, covered the veg in olive oil, salt and pepper, using my hands to toss everything and make sure it was all coated.


For Christmas I was given new baking sheets! They are aluminum. I don't use teflon. I don't like cancer. So I gave these a coating of olive oil as well to help the egg rolls not stick.

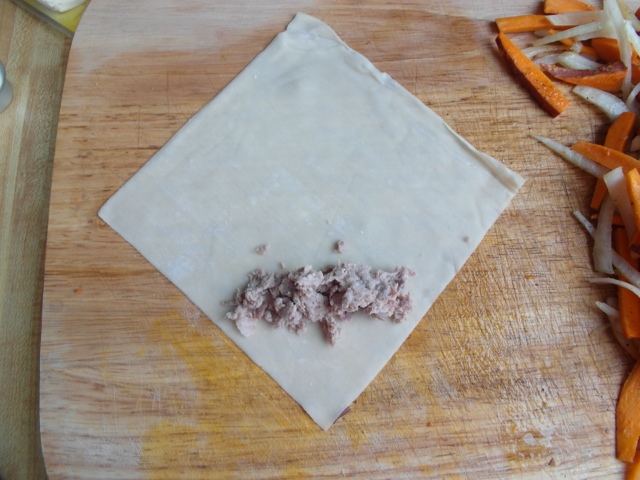
To assemble, I placed one wrapper at a time on my cutting board, point towards me.


I added about 1 1/2 tablespoons of pork, and enough veg to cover the pork.


Then I rolled them thusly.


After rolling, place the egg roll on the baking sheet seam side down.


You can see here where I tried to tuck the corners too tightly and ripped the wrapper. This happened several times. I tried to just wrap the top over the holes.


I filled all 15 wrappers in the package. The last two were a little overstuffed, but I used up all of the potatoes and onions. ;)


I had a hard time deciding at what temperature to bake them. I found recipes ranging from 350 to 450. I decided to settle on 375, hoping that the sweet potatoes would bake at that temperature. I also debated whether or not I should have brushed the tops of the egg rolls with oil. The bottoms would get browned from the oil on the pan, but I wasn't sure about the tops. I decided not to.

I baked them at 375 for 10 minutes, flipped them over, and baked for another 10 minutes.

smashing garlic with my knife

For the sauce I combined 3 ounces of Greek yogurt with 2 tablespoons of dijon, a clove of garlic that I minced, then smashed with my knife and a pinch of salt (the course salt helps break down the garlic), another half teaspoon of salt, and some black pepper.


First the bad news. When I flipped the egg rolls after the first 10 minutes in the oven, most of them were stuck to the baking sheet in spite of my layer of oil. I'm not sure how to fix this problem, except to not use aluminum pans. I didn't love the texture of the meat. This was probably more of a problem with the stand mixer's shredding than with the pork roast itself. I guess next time I'm back to using a fork and my fingers. Sigh. And finally, the texture of the wrapper wasn't the best. The first side down was very crispy except for where it had ripped when then stuck to the pan. But the second side wasn't as crisp. I could either brush the tops with oil next time as I had considered, or FRY THEM!

The good news was that vegetables were delicious and the sweet potatoes were fully cooked! None of the holes I made in the wrappers made any difference with the finished product. And the dipping sauce was delish. I'd say I enjoyed the sauce more than the egg rolls themselves.


This was far from my favorite meal, but I'm glad I made it. I'm closer now to being able to make a delicious egg roll than I was before I tried. And the assembly process was simple enough that I'm motivated to try again.

Sunday, March 17, 2013

Babies

Spring is here! I refuse to have any more negative thoughts about the weather. It is spring! Green things are happening. The chickens were spotted yesterday scratching in the dirt for live things to eat for lunch.

Broccoli sprouts in the morning sunlight.

It's been just over a week since I started my indoor vegetables, and look at everything that's come up!

Peas!

I was out of pea seeds, so I picked up the packet of sugar snap peas for $0.20 at Walmart. I didn't expect them to do well, but almost every pea of the over 20 that I planted has sprouted!

Tomato row.

These tomatoes are all from seeds that I saved last year and back in 2010 before we moved. Almost every single one has sprouted. I'm so proud.

My favorite baby crop is the broccoli seedlings. They come up such a pretty shade of green with dew drops clinging to their little heart shaped leaves. They scream spring!

It's so much easier to keep my spirits high when I've got seedlings to check on every morning. A little bit of green always makes me feel better.

Happy St. Patrick's Day everyone!

Sunday, March 10, 2013

Depressing weather!

Yesterday I harvested these.


The chickens devoured the green tops! I'm making a casserole today, sausage over potatoes, carrots, and onions. We dug the carrots I planted last October. There were quite a few weeds thriving happily in the cold frame. I'm sad to report that the glass in the window broke. I would blame Sirius Black, who loves to sit on the window, but it was the inner layer of glass that broke. I'm wondering if there was such a temperature difference between the inside and outside of the glass that it cracked. The top layer of glass was still intact, so we just set the window back over the frame. I planted spinach and a lettuce mix to replace the carrots. Yesterday was in the 40's, overcast, and raining most of the day. Perfect spring weather for spinach.

This is what my backyard looks like today.

My log cabin bird feeder.

Even the cats are huddled together for warmth!

I just want some green grass and sunshine! Last March I had tomatoes in the ground! I did start all of my indoor seeds yesterday. Some things, like green beans, I start in the ground once it's warm enough. Others, like my tomatoes and broccoli I start inside and harden them off by slowly leaving the pots outside for longer amounts of time before finally transplanting them into the ground. Nothing says spring to me like the smell of potting soil!

If only Mother Nature would get the message!

Wednesday, February 27, 2013

For the birds- Sweet potato, mushroom, parmesan quinoa

It's been snowing off and on, but mostly on, for over 24 hours now. Nobody saw this storm coming, so no one thought to get the plows ready or cancel school. Yesterday we all showed up at work and were sent home early.

Right now I just want to put on the tinniest shirt I can squeeze into and go stick my round belly in the sun. I keep telling my baby that the world isn't always like this. Spring is coming! But my arms are sore from shoveling snow and my abdomen clenches up when I go outside and get hit by the cold wind. I went out to check on the chickens yesterday and found 22 eggs hidden in the back of the coop. My husband had said that he thought the chickens were finally slowing down their production for the winter. Apparently they're just getting better at hiding their eggs. Usually, chickens need about 13 hours of sunlight a day to keep producing on a regular basis. In the dead of Iowa winter, we can get about 9. And I refuse to make my girls work overtime by putting a light in their coop. But, my girls continue to lay 5-6 eggs every day.


Enough about the depressing weather. As my morning sickness slowly fades now that I'm 18 weeks, I've been able to start making dinner again. Monday, we had sweet potato, mushroom, and parmesan quinoa for dinner. We started eating quinoa about six months ago and I'm in love with it. A friend suggested quinoa and frozen veggies as a quick supper when I was too nauseous to cook and she was right! Quinoa blows my mind. In college bio, I was taught that the only way to get all of the amino acids (protein bits) my body needed in one source was to eat meat. Not that I have anything agains meat (when it's organic and raised on pasture), but that's not true. Quinoa has all of the amino acids that humans need, which makes it a complete protein. And since I went months without being able to digest meat, it was my hero. We treat quinoa a lot like pasta. If you can do it with pasta, you can do it with quinoa. And my favorite way to eat quinoa is with LOTS of parm!

Tiny quinoa grains


Start by dicing half an onion. I used white, but you could use yellow.

Next, dice your sweet potato. I give mine a good scrub with the steal wool to get any tough bits and dirt off, but I leave the skin on. Cut it into disks, cut the disks into sticks, and cut the sticks into cubes. It helps to buy a skinny and long sweet potato instead of a fat one. Your knife will go through it easier. Try and chop all of your veg into the same size so it will cook at about the same rate.


Next, chop up the old, sad mushrooms you have in the back of the fridge. You could certainly use more than I have pictured here. I'd say up to a half cup.


When your veg is chopped, hit a pan with some olive oil over medium heat and throw everyone in. We're looking for the sweet potatoes to get some browning around the edges and the onions to become translucent. Give it an occasional stir.


While that's cooking, grate up 1 cup, not packed, of good parm. Don't cut corners and buy pre shredded, or worse, parm in a plastic can. Use the good stuff. It's worth it! I use the small "fancy" shred side of my box grater.


When you're veg is cooked, throw in your quinoa. I use a coffee mug to measure because I'm lazy like that, but this is about 1 cup. The important thing is to use a 1 to 2 ratio when adding your water. Some people feel the need to rinse their quinoa before cooking it. It can have a bitter outer coating that is easily removed in a mesh strainer under some cold water. I buy the quinoa out of the bulk bins at my local grocery and have never had any issues with it tasting bitter. Either way, throw the quinoa into the pan and toast it for a minute.


Add 2 cups, or twice the amount of quinoa, of water, salt and pepper. Remember that we're adding a cup of salty parmesan later, so don't go overboard on the salt. Cover your pan and turn up the heat until you've reached a boil. When it's boiling, turn the heat down so nothing scorches, and continue to cook for about 10 minutes until the quinoa has absorbed all of the liquid.


When there's no water left in the pan, the consistency will feel somewhat like cooked rice, add your parm and give everything a good stir to coat with the cheese. And you're done.


I crumbled some parsley that I picked from my garden and dried this fall, as a garnish. It would also be good with some fresh basil.


One thing that I've noticed about quinoa is that it's filling! I have to limit my serving size or I end up full way before I've cleaned my plate. This recipe was enough to feed both of us dinner with LOTS of leftovers. And it keeps well in the fridge so we can easily reheat it for a fast, healthy lunch.


Black capped chickadees getting some brunch on my feeder. They wish it was quinoa.